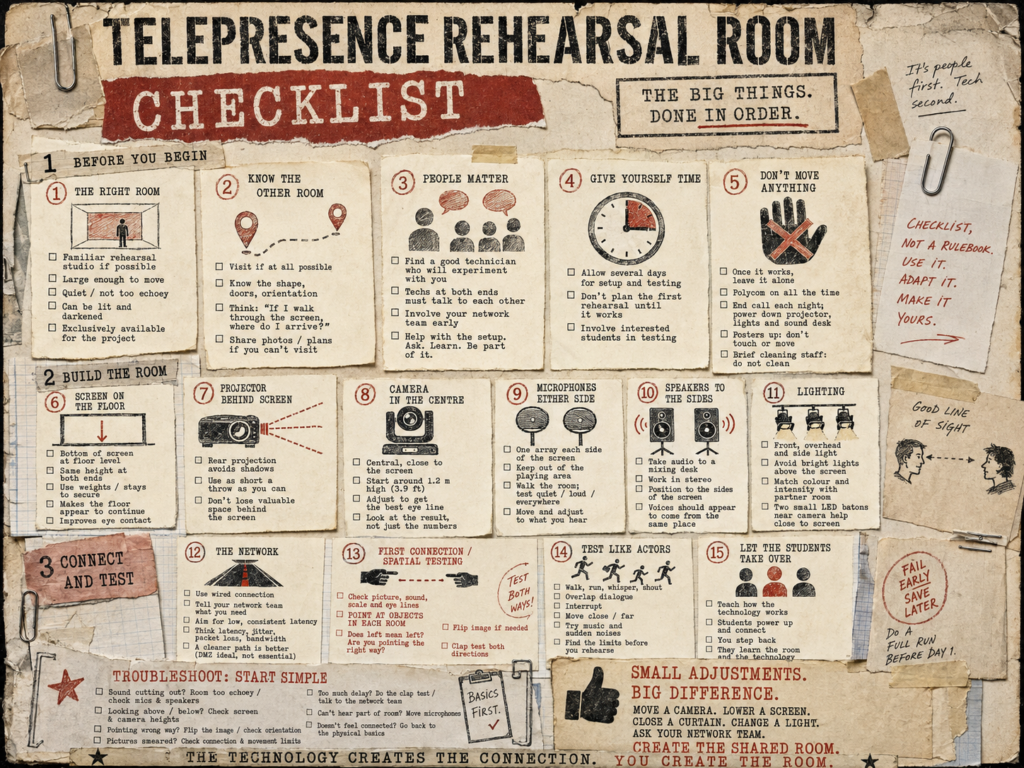

You don’t need a purpose-built telepresence studio to do this.
Our system has grown up over a number of years, built from fairly ordinary videoconferencing kit, a projector, some microphones and speakers. The important part isn’t owning the same equipment we do. It’s how you arrange it, so that two separate rooms start to feel like one continuous rehearsal space. If you’d like to see the range of systems out there, from the complex to the refreshingly simple, take a look at our ‘Useful Links’ page.
This page is advice, not a rulebook. It’s a collection of tips and tricks we’ve picked up through ten years of trial, error and, occasionally, a fair bit of luck. It walks through how we set up a room using a Polycom-based system, what we’ve learned by getting things wrong, and some of the small adjustments that make a surprisingly large difference. It isn’t a technical manual, and you’ll still need people who understand your local network and AV systems. But you don’t need to be a network engineer yourself.
When we started, we certainly weren’t.
If possible, start with a familiar rehearsal studio rather than a specialist technology space.
This matters more than it might seem. Students already understand a rehearsal room. They know what it’s for, how to move in it, how to work with other performers, and that it’s somewhere they can experiment and get things wrong. Telepresence works best when you hold on to as much of that familiarity as you can.
The idea isn’t that students suddenly step into a videoconferencing suite or some sort of “sacred high-tech space.” They’re still in their normal rehearsal environment. It just happens that half the company is somewhere else, appearing through one side of the room. That familiarity is what helps the screen disappear psychologically. Instead of becoming the thing everyone gathers around, it starts to behave more like an opening into another rehearsal space.
So the ideal room isn’t necessarily the most technologically impressive one. In fact, we try to keep the bulk of the technology hidden, to strengthen the illusion of a shared space. Look for somewhere familiar to the students, large enough to move in, reasonably quiet, not too echoey, easy to light and darken, suitable for rear projection and, ideally, available exclusively for the project. A standard rehearsal studio can work very well.
A disused wind tunnel, as we discovered, can work considerably less well. But more on that later.

If at all possible, visit your partner’s rehearsal space before the project begins. One advantage we had in our collaborations with both Finland and Mallorca was that we already knew each other’s spaces. We’d physically stood in them and understood their shape, where the doors were, where people entered, and how the room was normally used. That turns out to be surprisingly useful once you’re trying to make two separate rooms behave like one.
Telepresence isn’t simply about joining two pictures. You’re deciding how two pieces of architecture connect. On one occasion, something about the space immediately felt wrong. People were pointing and moving in directions that didn’t seem to make sense. Because we knew what the other room actually looked like, we worked out that the projected image needed to be flipped. The window and the doors were on the wrong side to where we expected them to be. We had, in effect, joined the wrong sides of the two rooms. Once the image was reversed, the geography made sense again.
If visiting isn’t possible, ask your partner for photographs, a floor plan, or a simple video walkthrough before you begin.
A useful question to keep asking throughout the setup is this:
If I could walk through the screen, where would I expect to arrive?

This is probably the most important practical advice we can give.
High-quality videoconferencing is rarely completely “plug and play,” particularly when you’re asking equipment designed for meetings to function as a rehearsal room. Find a technician who’s prepared to experiment with you, rather than one who simply installs everything and leaves.
It’s equally important that the technicians at both ends talk directly to one another. During a first setup there will almost certainly be problems, and putting the two technical teams in contact can save an enormous amount of time. If you’re working within universities, involve whoever looks after the institutional network early. Firewalls and security systems can quietly stop two apparently functioning systems from talking to each other.
Have a back channel for quick communication. We use WhatsApp, since we can share photos, videos and technical details as well as call each other. Email is too slow when you’re in the room trying to fix something.
Be part of the setup yourself. If you’re the tutor or director leading the project, don’t hand the job to the technicians and disappear until the room is finished. Help.
Carry equipment. Hold the gaffer tape. Move a stand. Make tea or coffee. Buy biscuits (or cookies). Stay around. Ask what people are doing and why.
You don’t need to become a technician, but you should take an interest in how the room is put together. And don’t treat technicians as servants. They’re collaborators. One of my pet hates is watching an academic or a director stand and watch a technician work for them without offering to help. Some of our most useful discoveries have come from tutors and technicians looking at a problem together and asking, “What happens if we move this?” Our entire project came out of these kinds of interactions.
Taking part also changes how you think about the technology. We’ve heard the project described more than once as “big Skype.”
It isn’t.
Once you understand why the screen is at a particular height, why the camera is in a particular place, why the microphones sit where they do, and why the route through the network matters, you start to understand that you’re constructing a shared playing space, not simply making a video call bigger.

Physically assembling the room may only take a few hours. Making the image, sound, eye contact, lighting and connection all work together can take considerably longer. For a new partnership, allow several days for setup and testing before bringing performers into the room. Students who are interested in the technical side can be involved in this process too.
Don’t plan to build the room at nine o’clock and start the first rehearsal at ten. Planning a project like this can take most of a year, and the more lead-in time you can give your technical team, the smoother the setup of the physical space will be. If at all possible, start the week before, and have scheduled times when your technicians can talk to network managers.

When we began this work, we didn’t understand the science behind it.
We didn’t know what latency, jitter, packet loss or bandwidth meant. We didn’t understand networking protocols. We had no idea what acoustic echo cancellation was. We didn’t even really understand how IP addresses worked. We learned because we needed to.
By working alongside technicians, repeatedly building the rooms, getting things wrong and trying to work out what had happened, we gradually learned enough to set up the system ourselves at both ends. We still work with technicians. They remain a valuable part of the team. The difference is that we now understand enough to know what’s possible, what might be improved, and what’s simply not achievable.
That matters.
Some problems can be fixed by moving a camera ten centimetres, lowering a screen, changing a microphone position, hanging some curtains, or finding a cleaner route through the network. Others are simply consequences of physics. Understanding the technology helps you tell the difference.

Zoom and Microsoft Teams are excellent meeting platforms, but they’re designed primarily for conversation rather than live performance. They prioritise reliable connections, intelligible speech and automatic management of changing network conditions. For actors, though, small delays matter. Performers need to interrupt, overlap, move together and respond instantly to physical and vocal cues.
Zoom and Teams also process audio to reduce noise and echo, which can interfere with music, movement and the natural sound of a rehearsal room. Both now offer higher-quality audio modes, but they still don’t provide the consistently low and predictable latency that lets two distant groups of performers start to feel as though they’re sharing the same space. And those higher-quality audio modes tend to switch off echo cancellation, so you end up swapping one problem for another.
There are many systems available for this kind of work. Polycom, LoLa, UltraGrid, MVTP and Nimbra are just a few examples. All of them have advantages and disadvantages. A system might offer very low latency but require specialist infrastructure. Another might be extremely easy to use but introduce more delay. A third might provide excellent image and sound quality but be too expensive or complicated for regular student rehearsal.
When looking at a system, we tend to think about things such as:
- ease of use;
- audio and video quality;
- latency;
- accessibility and cost.
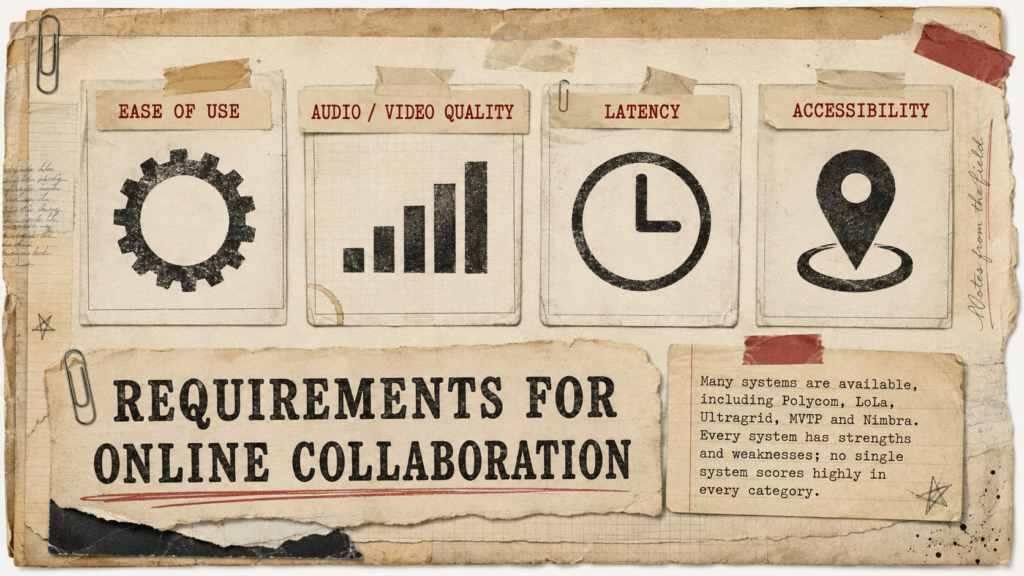
No single system is likely to score perfectly on all of these. So rather than asking “Which is the best system?”, ask “Which system is most appropriate for what we’re trying to do?” This guide concentrates mainly on the Polycom-based system we know best.
LoLa — Low Latency Audio Visual Streaming System
LoLa is a software and hardware system developed specifically for situations where very low delay matters, particularly remote music and performance. Its great advantage is latency: with the right network, it can make interaction between distant performers feel remarkably immediate, while maintaining very high audio and video quality. The downside is that it needs particular hardware and, more importantly, access to a very fast and well-managed network. This makes it an excellent specialist system, but less easy to set up using whatever equipment and network a university already has.
UltraGrid
UltraGrid is a software-based system designed for high-quality, low-latency audio and video transmission. One of its attractions is flexibility: it can run on relatively standard computer hardware, supports very high-resolution video and can be configured in different ways depending on the project. It’s also freely available. The trade-off is that it’s more technically demanding than a conventional videoconferencing system, and some configurations require substantial network bandwidth. It offers considerable control, but generally needs someone comfortable with networking, video formats and computer configuration, and ideally comfortable with coding too.
MVTP
MVTP takes a more specialised hardware approach. It uses dedicated equipment to keep the additional delay introduced by the video system extremely small, making it particularly attractive for music, performance and other activities where precise timing matters. It’s essentially a plug-in appliance rather than a piece of conferencing software running on a normal computer. That simplicity can be an advantage once the system is installed, but the specialist hardware is less widely available and offers less of the everyday flexibility of a standard videoconferencing platform.
Nimbra
Nimbra, developed by Net Insight, comes from the professional broadcast world. Its strength is the reliable transport of high-quality live video and audio across different types of networks, with sophisticated tools for managing latency, packet loss and signal quality. For large-scale or mission-critical productions, this can be extremely powerful. For a university rehearsal room, however, it’s probably more technology than most projects need: it’s professional media infrastructure rather than a simple performer-to-performer conferencing system, with the cost, equipment and technical expertise to match. Using a system such as Nimbra also requires specialist training.
The following is based on our Polycom setup. You don’t need to own exactly the same equipment. Think of this as a tested starting point rather than a compulsory shopping list.

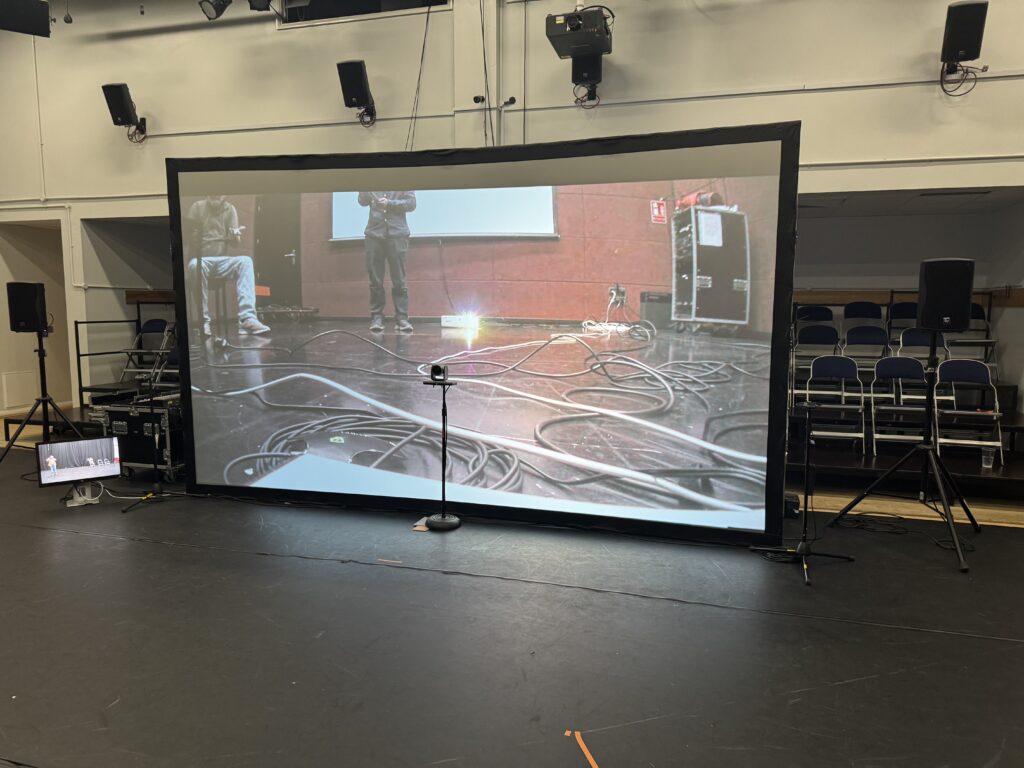
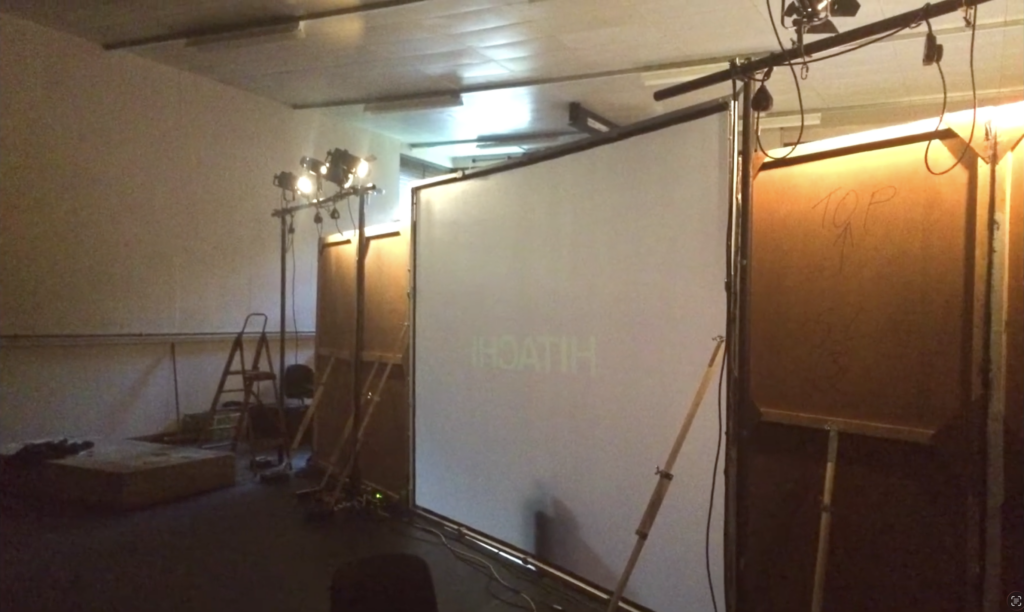
We use a Stumpfl Monoblox fast-fold rear-projection screen.
Overall size: 4470 × 2600 mm
Picture size: 4270 × 2400 mm
Approximately 14 ft × 7 ft 10 in
The scale of the image matters. We’re trying to avoid the feeling that the remote performers are appearing on a large television.
Ideally, somebody standing in the other room should appear roughly life-size. That’s one of the things that helps the screen begin to feel like an opening rather than a display.
This is one of the simplest parts of our setup and, strangely, one of the most important. We don’t use the stand supplied with the screen. The manufacturer’s stand raises the bottom of the projected image several inches above the floor. That may not matter in a conference room. For telepresence rehearsall, it matters enormously.
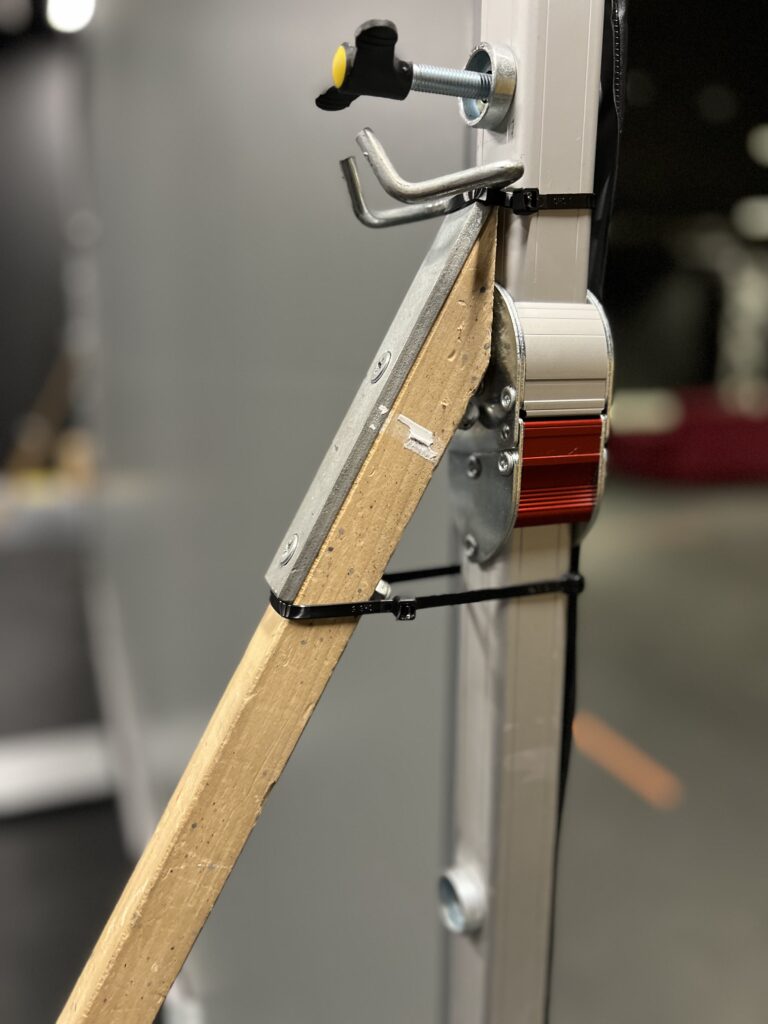
Instead, we put the screen frame directly at floor level and stabilise it using ordinary stage weights and simple wooden stays attached to the frame with cable ties.
Why?
Because we want the floor in one room to appear to continue into the floor of the other. If the projected image begins several inches above the real floor, the illusion is immediately weakened. You become aware that you’re looking at a screen. Put the image at floor level and it starts to behave more like an opening into another room.
It also affects eye contact, which is less obvious. Imagine the screen in one room is slightly higher than the screen in the other. The performers looking at the raised screen naturally lift their eyes slightly to see the faces in front of them. Their camera hasn’t moved. So the people at the other end see them looking slightly above their heads rather than directly at them. A difference of only a few centimetres can be the difference between somebody appearing to look at you and appearing to look past you.
So our starting rule is very simple: screen on the floor, same screen height at both ends. Use whatever safe stabilisation method is appropriate for your venue, the important thing is that the screen is secure.

Our minimum specification has been:
Panasonic PT-RZ970BEJ
10,000 lumens
Panasonic ET-DLE085 short-throw lens
The projector sits behind the screen. Rear projection means performers can move directly in front of their remote partners without casting shadows across the picture.
If you haven’t worked with projectors before, “throw” simply means the distance the projector needs to sit from the screen in order to fill it with an image. A standard lens needs a fair amount of distance to do this, which is fine in a conference room or lecture theatre, but in a rehearsal space it becomes a real problem. Every metre the projector needs behind the screen is a metre you don’t have in the room at all, and in rear projection, that space sits directly behind the performers’ entrance point, exactly where you can least afford to lose it.
This is where short-throw and ultra-short-throw lenses come in. They’re designed to produce a full-size image from a much shorter distance, using more aggressive optics to spread the picture out over a shorter space. A short-throw lens might fill the screen from a couple of metres away rather than the six or seven metres a standard lens would need. An ultra-short-throw lens goes further still, sometimes filling the screen from under a metre.
The exact distance between the projector and screen depends on the projector, lens and room, so don’t get too attached to a particular measurement. The practical principle is: use as short a throw as you reasonably can. Every extra metre you need behind the screen is a metre of useful rehearsal space you lose in front of it.

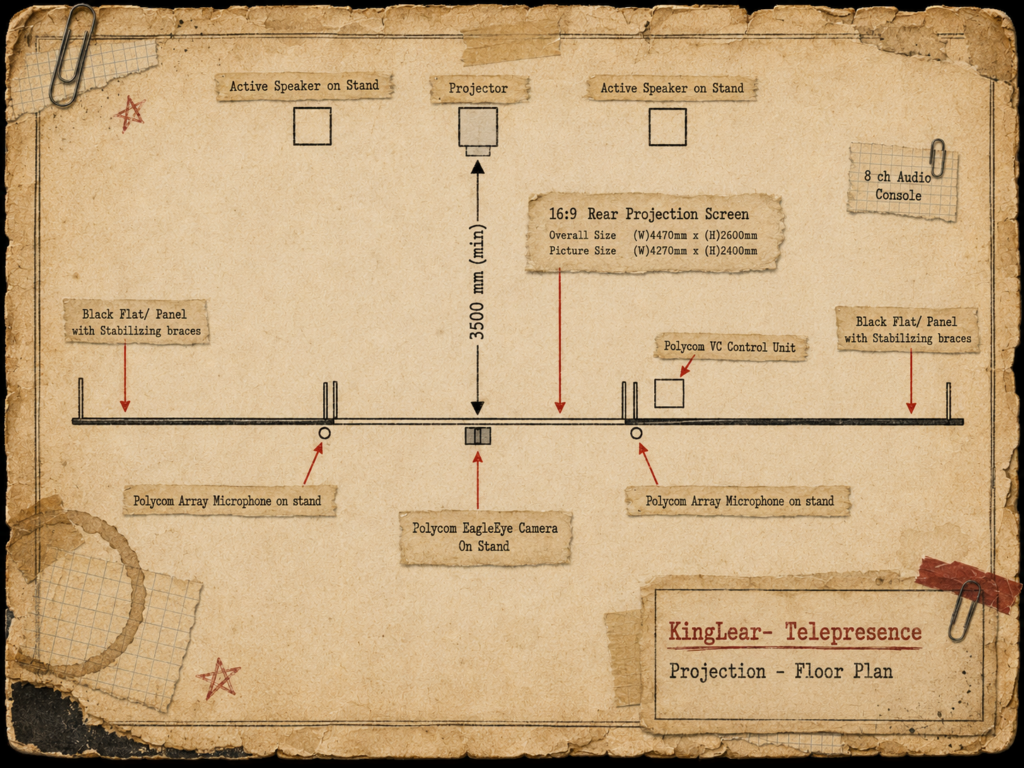
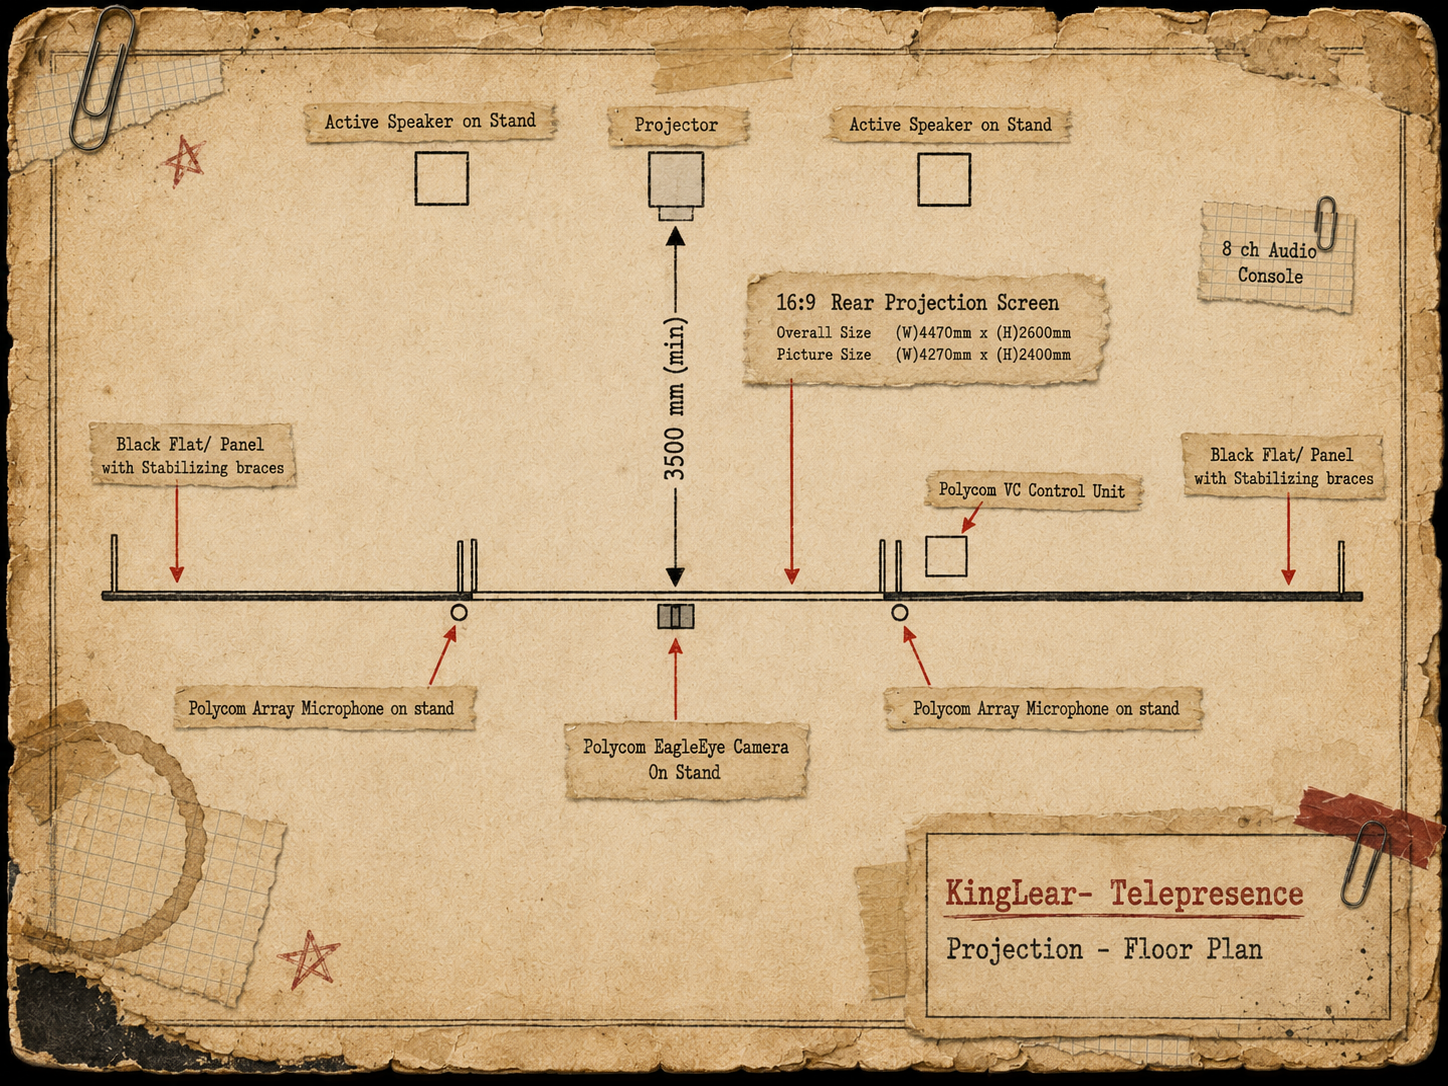
The basic arrangement is simple. The screen forms one side of the rehearsal room, with the projector sitting behind it, keeping a minimum of 3500mm between the two. The camera, a Polycom EagleEye on a stand, sits centrally in front of the screen. A Polycom array microphone on a stand sits towards either side of the camera, out in the room where the performers are. The speakers, by contrast, sit behind the screen towards its outer edges, so that sound appears to come from the participants on screen rather than from a fixed point in the room. At each end of the layout, a black flat or panel with stabilising braces closes the space off. The Polycom control equipment, along with the audio console, can sit safely behind the screen line rather than in the acting area.
The diagram above is from our original King Lear setup in 2017. The equipment has moved on since then, but the basic layout, screen and projector on the centre line, camera below it, microphones in the room and speakers behind the screen, remains the one we still use today.
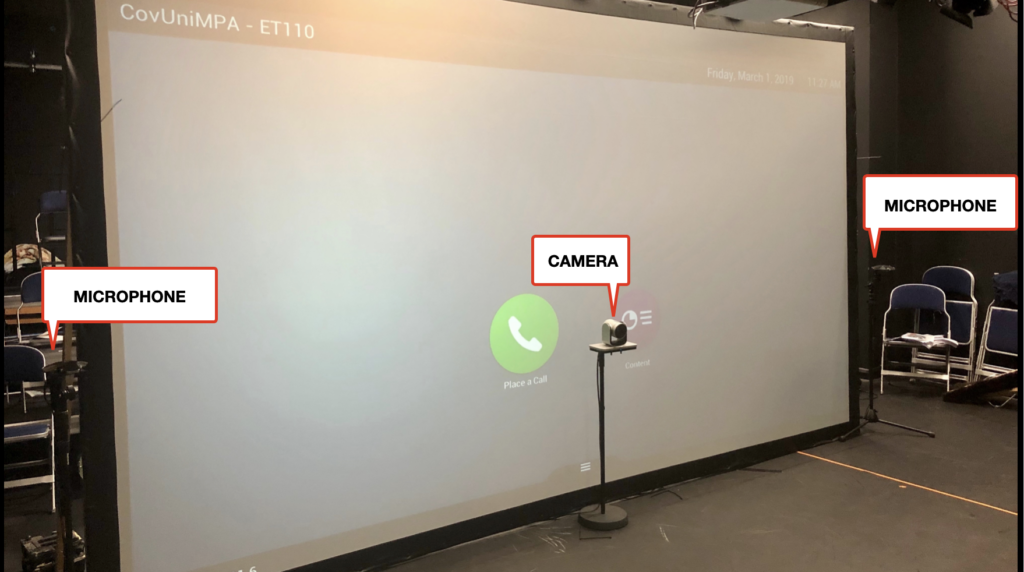

We use a Polycom EagleEye IV 12x camera, placed on a simple microphone stand in front of the centre of the screen. We normally start at around 1.2 metres / 3.9 feet high, with the camera as close to the screen as practical, but don’t treat that as a fixed rule.
Make the connection. Put somebody in both rooms. Look at what you actually see, then adjust. If the camera is too high, people may appear to look down at you, and if it’s too low, they may appear to look up.
There will always be a compromise, because the camera can’t literally occupy the same place as the eyes of the projected actor. The aim is to make the difference small enough that performers eventually stop noticing it. Look at the result, not just the measurement.
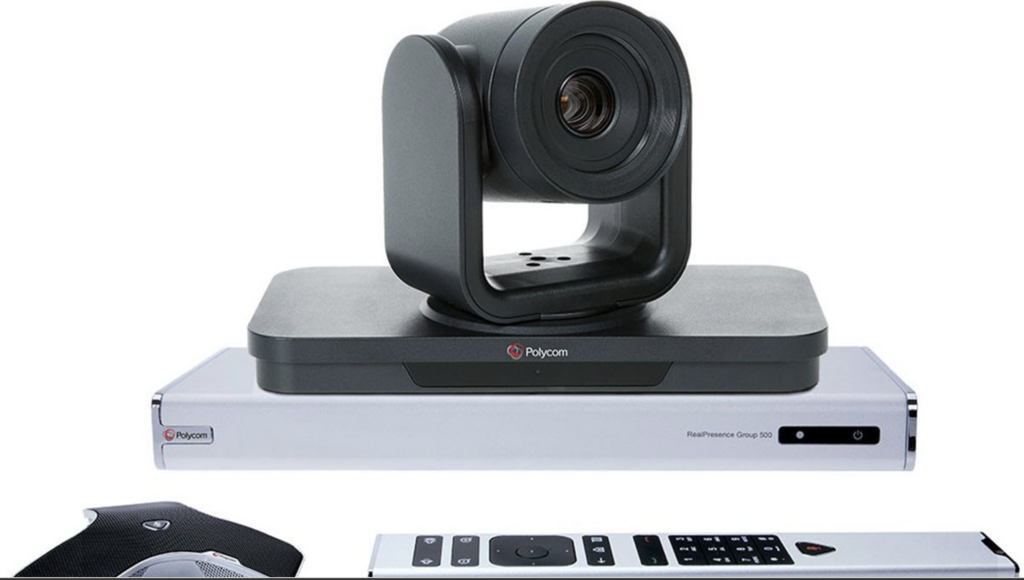

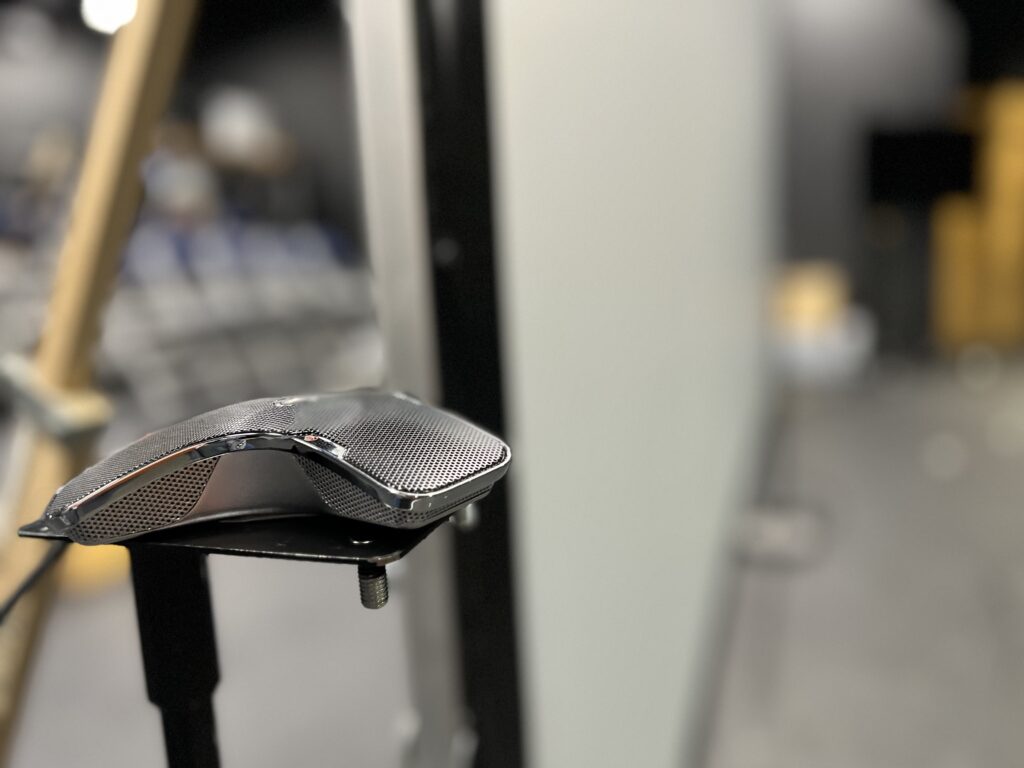
We normally use two Polycom microphone arrays, one positioned towards either side of the screen. These microphones pick up sound from all directions, in a full 360 degrees, meaning they behave fairly much the way a listener’s ears would in a real space.
That matters because it lets the microphones mimic something actors already understand instinctively: how sound behaves in a room. The further you are from the screen, the more you naturally have to project to be heard clearly on the other side, just as you would if you were further from a scene partner in a normal rehearsal room. Move in close, and you can drop into something quieter and more intimate, and that will still come across. The system isn’t trying to flatten out this natural variation and make everything sound the same. It’s trying to preserve it, so that vocal choices the performers make for very ordinary theatrical reasons still read correctly at the other end.
This is actually one of the main reasons we don’t use radio mics, even though they would give us crisper, more consistent audio. Radio mics follow the performer, picking up their voice at a constant level regardless of where they’re standing in the room. That’s exactly what we don’t want. It would quietly remove the very thing we’re trying to preserve, the sense that this is a real space with real distances in it, not a broadcast feed of a real space.
The exact position depends on the room. The practical answer is: put them either side, keep them out of the playing area, then adjust according to what you hear.
Our basic setup uses:
2 × long microphone cables suitable for the Polycom microphone arrays
2 × Polycom microphone arrays
2 × microphone stands

The room itself makes a considerable difference to the sound. A relatively acoustically “dead” rehearsal room is much easier to work with than a large space full of hard, reflective surfaces. We discovered this the hard way.
One of our earliest Coventry systems was installed in a disused wind tunnel. It was large, and initially we thought it might make a very good performance space.
It didn’t.
Our partners in Tampere began reporting a strange effect. It sometimes felt as though we were constantly interrupting them. Eventually we discovered that the room’s acoustics were confusing the videoconferencing system’s acoustic echo cancellation.
Once the connection is running, walk around the room. Stand at the back. Move close to the screen. See where you’re in shot and where you vanish from shot (you can use a separate monitor or ‘Picture in Picture’ to do this. You may want to mark the playing area with tape for the performers. Speak quietly. Speak loudly. Have several people talking. If performers can be heard clearly wherever they are likely to work, the microphones are doing their job.
You don’t need to understand the algorithms. The practical lesson is this: if people’s voices keep disappearing whenever somebody at the other end speaks, your room may simply be too echoey. Curtains, drapes and other soft materials can make an enormous difference.
We take the audio from the Polycom into a small mixing console, and from there into two powered speakers. Our setup uses active DI boxes, appropriate audio cables, an 8-channel mixing desk and two active speakers on stands. There’s no particular speaker make or model you need, any suitable active speakers you have access to will do.
We work in stereo, positioning the speakers towards the sides of, and behind, the screen, at a height matched to the standing performers, so that voices appear to come broadly from the same place as the people you can see rather than from a fixed point in the room.
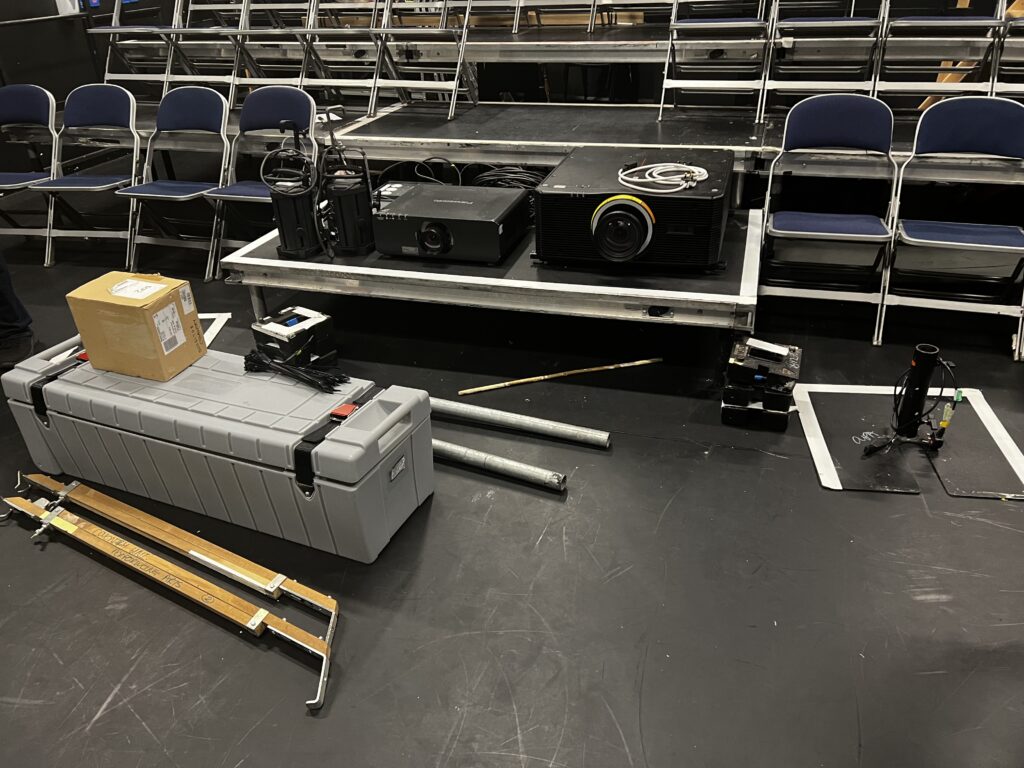

You don’t need an elaborate theatrical lighting rig for rehearsal. We normally use a mixture of front and overhead lighting, with side lights on stands. Avoid very bright lights immediately above the screen, performers spend a great deal of time looking towards it, and a powerful source directly in their eye line quickly becomes uncomfortable.
We also use two small LED batten lights on the floor near the camera, to give a little extra light to faces when performers work close to the camera.
The two rooms don’t have to be identical, but talk to your partners about colour and intensity. If one room is extremely warm and the other extremely cool, the join becomes more obvious. For rehearsal, keep it simple. Can everybody see each other’s faces? Are the actors comfortable? Can you achieve that without washing out the projected image?
Our work has mainly used Polycom RealPresence Group systems. A typical system includes a control unit, an EagleEye camera, two microphone arrays, a remote control and access to the administration settings. We also make sure we can access the system from a laptop, so that settings can be changed while somebody else moves around the room.
At the moment we use matched Group 800 units, but the equipment at the two ends doesn’t necessarily have to be identical, we’ve successfully connected Polycom and Cisco systems in the past. Matched units simply make setup and troubleshooting easier.
You may see terms such as H.323 and SIP. Think of them as two different languages that videoconferencing systems can use to dial each other up and agree on how to send the picture and sound, in much the same way a phone needs a dialling standard to connect a call. H.323 is the older of the two, SIP is more modern and now more widely used, but the two can often be made to talk to each other. You don’t need to understand how either works under the bonnet. What matters practically is that your two systems are speaking the same language, or that your technicians know how to bridge the two if they aren’t.

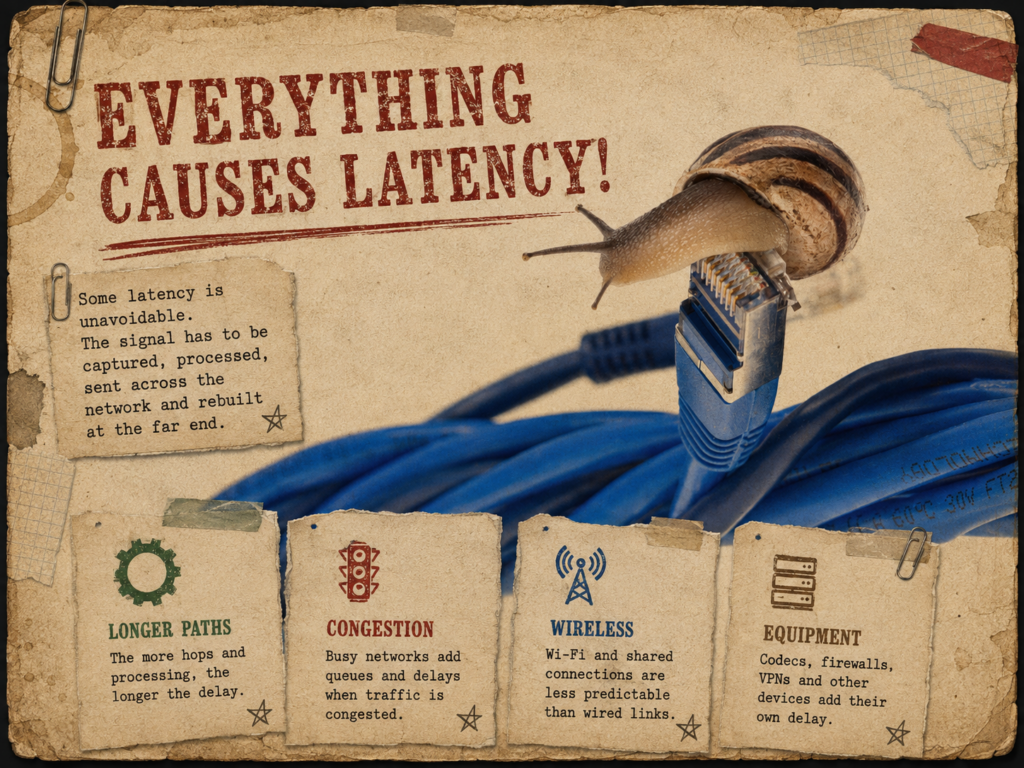
Latency is just a fact of life. We can’t beat it, we just have to live with it. Be realistic about what you can expect to do in the space, even with a delay of half a second.
Latency is simply the delay between something happening and its effect being received somewhere else. We experience small amounts of latency all the time. Sound itself takes time to travel across a rehearsal room or concert hall, and performers constantly make tiny adjustments to what they see and hear from one another. Usually those delays are so small, or so familiar, that we barely notice them. The difficulty comes when the delay becomes large enough to interfere with that natural process of action and response. In theatre, this can affect cueing, interruption, eye contact and physical timing.
In music it becomes even more critical, because musicians are continually adjusting their timing in response to one another. Research by the Stanford composer and acoustician Chris Chafe and his colleagues shows that latency does more than simply make everything happen slightly later. Musicians begin to adjust to the delay, often without being consciously aware of it. As latency increases, they tend to slow down, and beyond a certain point it becomes increasingly difficult to maintain a steady rhythm together.
But latency isn’t something invented by networks. It exists in any physical space, because sound takes time to travel. Performers standing several metres apart already experience a small delay between an action and the sound reaching them, and the greater the distance, the greater that delay. In a real ensemble this is usually small enough for musicians to accommodate naturally. Chafe’s research suggests that the most stable remote playing happens when network delay stays within a range comparable to these familiar acoustic delays.
This is a useful way of thinking about latency in telepresence. The aim isn’t necessarily to eliminate delay altogether, which is impossible, but to keep it small and predictable enough that performers can respond to one another naturally. Once it becomes too great, latency doesn’t simply delay the performance, it begins to change the performance itself.
Nothing in this process happens instantaneously. The camera captures an image. The microphones capture audio. The system processes it. The network sends it. Other equipment handles it along the way. The system at the other end receives it and turns it back into picture and sound. Every stage adds something. We’re not trying to eliminate delay completely. We’re trying to keep it small, stable and natural enough that performers can listen, respond and work together, without the technology continually drawing attention to itself.


You don’t need a detailed understanding of network science. Think of the connection between the two rooms as a road, and think of your data as a pizza delivery driver, weaving through traffic to get your order to you hot, fresh and in one piece.
Latency is the journey time. How long is the trip from the pizza place to your door? The longer or more complicated the route, the longer it takes for sound and picture to arrive. A very good driver on a very good night still can’t make the journey instant.
Bandwidth is the width of the road. How many delivery drivers can travel side by side at once? More bandwidth means more information can travel in parallel, but a six-lane motorway doesn’t get any single pizza to you faster than a well-run single lane would. More road isn’t the same as a shorter journey.
Jitter is an unpredictable journey. Does the driver arrive at roughly the same time every time, or is one delivery two minutes early and the next ten minutes late? For performance, an inconsistent delay can sometimes be more troublesome than a small but predictable one, actors can adjust to a driver who’s reliably a bit slow. They struggle with one who can’t be trusted.
Packet loss means something didn’t arrive. Sometimes part of the order just doesn’t make it, a portion of garlic bread lost somewhere on the way. The system has to compensate, which may show up as a sound dropout, picture glitch or brief distortion.
That’s probably all most tutors and actors need to understand. Some latency is unavoidable, even the best driver still has to cross town. The aim isn’t to eliminate it, but to keep it small and consistent enough that performers can work with it.

Videoconferencing systems use a wired Ethernet connection, none of them will run over wi-fi. Don’t try to become a network engineer yourself.
Tell your network team what you’re trying to achieve: live two-way HD video and audio, performers frequently speaking simultaneously, low and consistent latency, and a connection stable enough to run for long rehearsal periods. Then let them work out how best to provide it.
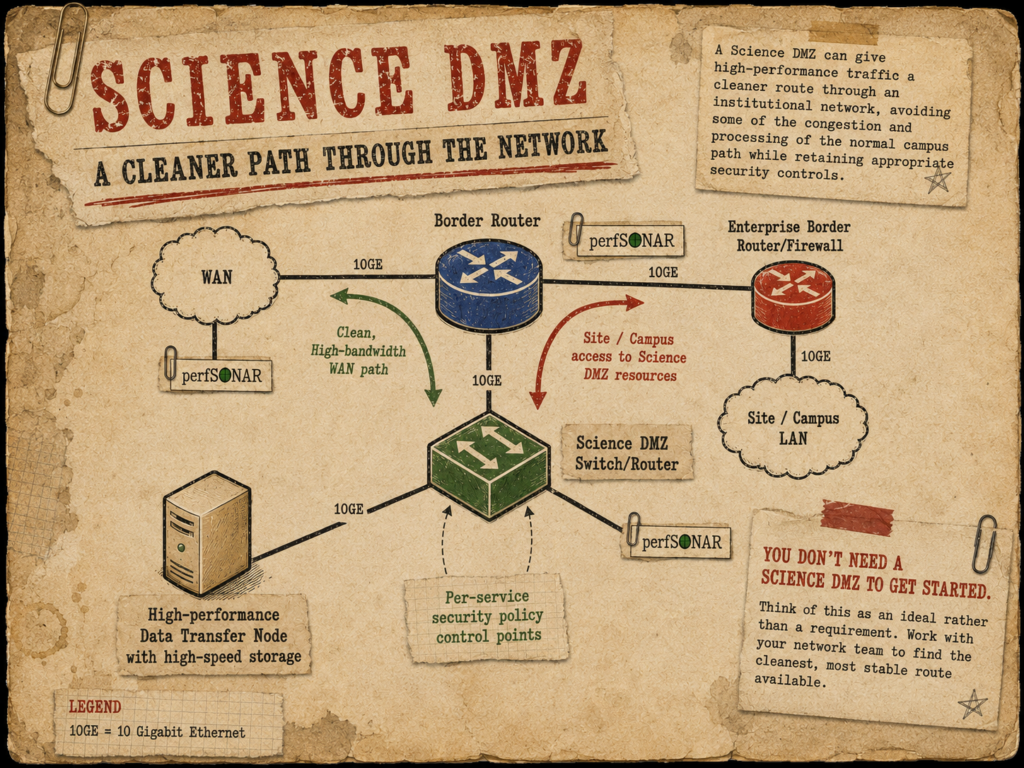
If your university has one, you may hear the term “Science DMZ.” This is a dedicated part of an institution’s network designed for high-performance activities that need to exchange large amounts of data or communicate reliably with external partners. Rather than sending traffic through all the layers of a normal campus network, it provides a cleaner, more direct route, while still maintaining appropriate security controls and monitoring. For telepresence, the attraction is that reducing unnecessary network processing and congestion can help make the connection more stable and predictable.
You don’t need a Science DMZ to get started, we’ve worked successfully without one, and it’s worth thinking of it as an ideal rather than a requirement. If your university has this kind of infrastructure, talk to your network team about it. If it doesn’t, that doesn’t mean you can’t do telepresence. The principle is simply this: find the cleanest, most stable route available to you.
For readers who want considerably more technical detail, we can provide separate information on network routing, firewalls, QoS and Science DMZ configuration.

Once you’ve spent time getting everything right, don’t move anything. Ideally, the room should be dedicated to the project for its duration.
We leave the Polycom system switched on throughout the project. At the end of each day we simply end the call and switch off the projector, lights and sound desk, the Polycom stays on, the camera stays where it is, the microphones stay where they are, and the screen stays where it is.
If other people may enter the space, put up notices asking them not to touch, unplug or move anything. We also brief the cleaning staff and ask them not to clean around the setup during the project. That may sound overly cautious until somebody nudges the camera stand a few centimetres and suddenly the carefully matched eye lines no longer work.
Treat the telepresence room rather like a theatre set left overnight between performances. If it worked yesterday, leave it where it is.
Once both rooms have been built, don’t immediately start rehearsing. Connect them and look carefully at what you have.
Can you see the whole playing space? Can everybody be heard? Are the people at the other end approximately life-size? Do the floors appear to join? Do the eye lines feel convincing? Does the sound appear to come from roughly the same direction as the performers? Then check the geography.

This is an extremely simple test, and a surprisingly useful one.
Stand in one room and point at things on the screen. Point towards a door. Point at the left edge of the remote room. Point towards one of the performers. Ask the people at the other end whether you’re pointing where you think you are. Then repeat the exercise from their side.
If you point left, does left still make sense in the other room? If not, the image may need to be flipped, or the spatial relationship between the rooms may need adjusting. This is exactly the problem we described earlier in “Know the other room, if you can,” where we discovered we’d joined the wrong sides of two rooms and had to flip the image to make the geography agree again. A technically perfect picture can still feel completely wrong if the geography doesn’t make sense.
You’re trying to create one continuous room. Make sure the directions agree.

A system can work perfectly for a meeting and still be dreadful for performance. Don’t simply stand still and ask, “Can you hear me?”
Walk quickly across the room. Run. Whisper. Shout. Overlap dialogue. Interrupt one another. Have several people speak at once. Stand close to the screen. Move away from it. Try rapid cueing. Test music if you intend to use it. Test sudden noises and physical activity if those will be part of the work.
Walk around the room. Stand at the back. Move close to the screen. See where you’re in shot and where you vanish from shot, you can use a separate monitor, or picture-in-picture, to check this. You may want to mark the playing area with tape for the performers.
Worth being realistic here: with a Polycom-based system, latency typically sits somewhere around half a second, which is usually manageable for dialogue, but makes playing music or singing together in real time practically very difficult. If music and shared timing are central to what you want to do, it’s worth looking at one of the more specialist systems we mentioned earlier, LoLa, MVTP or Nimbra, rather than trying to force it through a conferencing-first system like Polycom.
The purpose of the test isn’t to prove that the system works. It’s to find out where it stops working, before you begin rehearsal.

We use a very simple test to demonstrate latency. One person counts, “One, two, three,” and then claps. Then do it the other way around, with the other room giving the count.
The side matching the instruction, following along with what they see and hear, tends to be the one that looks in sync. It’s the side giving the instruction, whose live action you’re comparing against the delayed response coming back, that shows you the latency.
We use this during technical setup, but we also do it with the performers at the start of the rehearsal process. Most actors don’t need a scientific lecture about latency, they need to experience it. The clap test demonstrates very quickly that the person at the other end really did respond immediately, you simply received their response slightly later. That becomes useful once you start working with dialogue and physical cues.
The first day with the performers is usually deliberately playful. We don’t begin with a lecture about the technology, we use games.
A lot of them involve passing or throwing imaginary objects across the screen. One performer throws an imaginary ball, or some other object, towards the remote room, and somebody at the other end catches it. It sounds very simple, but it immediately tests latency, eye line, spatial awareness, scale and timing. It also helps performers discover where the edge of their room seems to connect with the other.
We often form two halves of a circle, with half the performers in each location. When the setup is working well, the two semicircles appear to join and form one complete circle.
These exercises let performers discover the rules of the shared room physically, rather than having those rules explained to them. Many traditional theatre games adapt well, mirroring, rhythm games, group counting, imaginary objects, physical offers and movement around a circle can all work. The useful question to keep asking is: what happens if this exercise has to cross the screen?
The aim on the first day isn’t perfection. It’s to let the company play, make mistakes, and begin to understand the physical grammar of the space.

Once the connection is working, treat it as an actual rehearsal room.
It can be surprisingly tempting to think of the performers on the screen as being thousands of miles away. Technically, of course, they are. But that isn’t a particularly useful way to work.
For the purposes of the rehearsal, they’re on the other side of the same room. Behave accordingly.
Everything happening in both spaces should be focused on the performers who are working. We’ve occasionally had situations where, on one side of the connection, people have been coming and going, eating lunch, discussing lines or having unrelated conversations while actors at the other end are trying to rehearse a scene. Apart from being distracting, and sometimes rather annoying, it immediately breaks the illusion that everyone is sharing the same rehearsal room.
Remember that the cameras and microphones don’t create a private performance area surrounded by invisible walls. If you’re in shot, you can be seen and heard. And if you’re out of shot but talking, you can probably still be heard. Our microphone arrangement is deliberately designed to pick up the whole rehearsal space, including areas outside the immediate playing area. That’s useful when actors move around the room, but it also means a conversation taking place at the side of the studio may be transmitted perfectly clearly to everyone at the other end.
Think about it exactly as you would in a physical rehearsal room. You probably wouldn’t sit three metres away from two actors rehearsing a quiet scene and start discussing where you were going for lunch.
Don’t do it here either.
Stay off your phone
Phones can be particularly disruptive. Where possible, print the scripts rather than asking performers to work from scripts on their phones. Apart from the practical advantages of having a physical script, it removes the ambiguity of somebody staring at a phone during a rehearsal. Are they checking a line, replying to a message, or looking at social media? It’s much easier for everybody if the rehearsal space remains a rehearsal space.
Build in a turnaround
Rather than allowing questions, conversations, bathroom trips and technical adjustments to gradually interrupt the work, we find it useful to create a short turnaround between scenes.
Finish the scene. Stop. Then give everybody a few minutes to reset. That’s the moment to ask questions, check something in the script, move a prop, go to the bathroom, answer a message if necessary, or deal with a small technical problem. Then bring both rooms back together and start again.
It creates a much clearer rhythm, and helps both groups feel that they’re working to the same rehearsal structure.
Don’t disconnect every time you stop working
One of the more interesting things we’ve discovered is that you don’t necessarily need to end the connection when the formal rehearsal stops. Leave it connected during the lunch break and see what happens.
People begin talking across the screen. Someone compares what they’re eating with someone at the other end. They start swapping notes on where they’ll take each other for dinner when they finally meet up in person. Students compare what they’re doing later. Someone wanders over because they heard a conversation. The screen stops being something that’s only activated when the director says “start,” and begins to function more like an open doorway between two spaces.
Those apparently unimportant moments can help enormously with the feeling that this is one company, rather than two groups periodically connected by technology.
The basic rule is very simple: treat the remote room exactly as you would treat the other half of your own rehearsal room.

Eventually, the students should understand how the room works too. We now teach them the basic principles behind the technology as part of the process. The aim isn’t to turn acting students into AV technicians, it’s to remove some of the mystery.
This all started, in fact, rather suddenly. On the way into work one morning, one of us hadn’t felt quite right, but put it down to tiredness and carried on regardless. Two hours before the project was due to start, a test confirmed Covid, and there was no choice but to leave immediately, mid-project. Before going, there was just enough time to leave instructions on our Facebook group: how to place the call, which remote button did what, where the blackout switch was for the lights. Then the equipment got a thorough wipe-down with antiseptic wipes, and it was straight home. The students picked it up from a few hastily written notes and simply carried on.
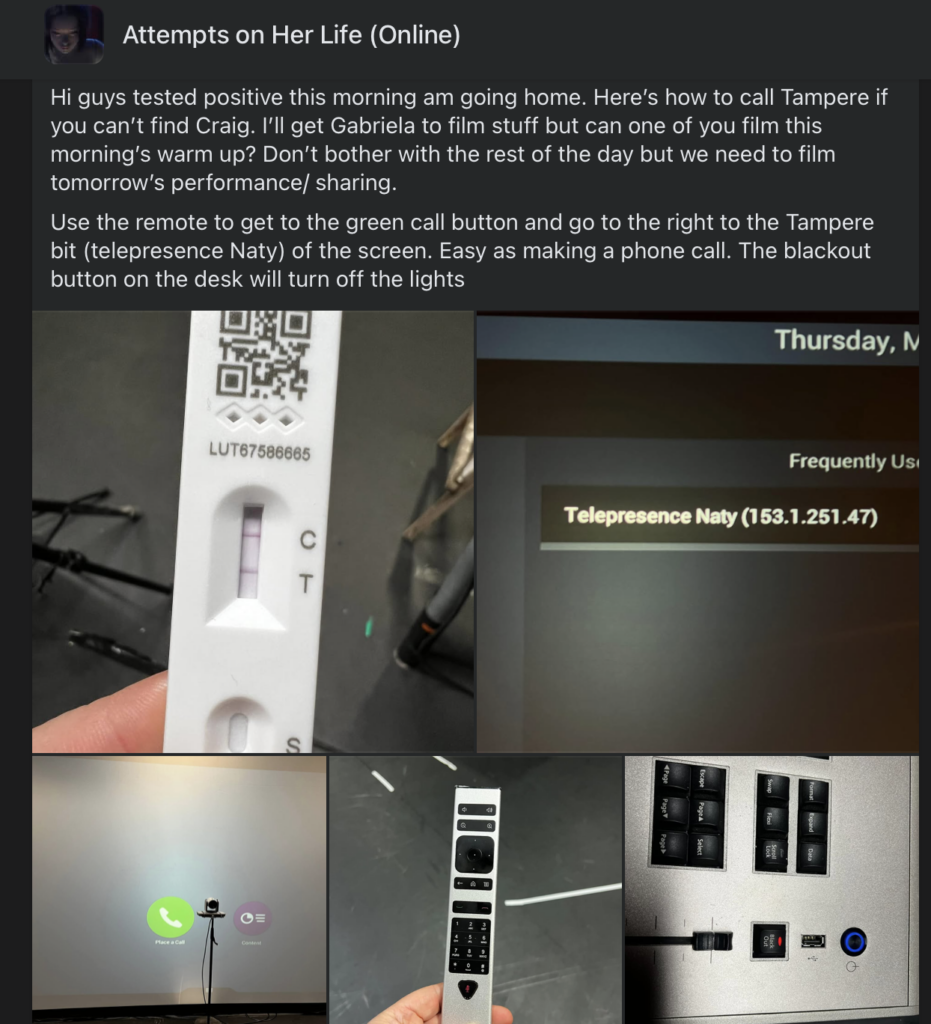
That changed our approach. Now, once a project is underway, we deliberately start handing responsibility over. Because the Polycom normally stays powered throughout the project, this usually means asking the students to establish the call, check the picture and sound, and make sure both rooms are functioning correctly. After the first few days, we ask them to make the connection themselves. Our partners in Palma do the same at their end.
The technology gradually stops being something operated for the students and becomes part of their rehearsal space. They also begin to respond differently when something goes wrong. Instead of immediately waiting for a technician, they start asking sensible questions:
- Is the problem happening at both ends?
- Has something moved?
- Is the sound problem local or remote?
- Is the call still connected?
- Is what we’re experiencing actually a fault, or is it simply latency?
Sometimes they can fix the problem themselves. Sometimes they need help. Both are fine.

The sound keeps cutting out? The room may be too reverberant. Try drapes or other soft materials, and check the relationship between microphones and speakers.
People appear to be looking above or below one another? Check the screen heights and camera heights at both ends.
Someone points left and appears to be pointing right? Check whether the image needs to be flipped.
Movement looks smeared or ghosted? Check the connection, but remember that videoconferencing hardware designed for meetings may have limitations when handling rapid theatrical movement.
There’s a noticeably long or inconsistent delay? Do the clap test. If it seems excessive, involve your network team.
Part of the room can’t be heard? Move the microphones before assuming you need more of them.
The two rooms simply don’t feel connected? Go back to the physical basics: screen height, floor line, image scale, camera position, orientation, lighting and sound direction.
Quite often, what feels like a sophisticated technology problem is actually caused by something simply being in the wrong place.

After doing this for a number of years, we’ve found that some of the biggest improvements come from the smallest adjustments.
Move a camera ten centimetres. Lower the screen. Close a curtain. Move a speaker. Change the lighting. Flip the image. Ask the network team whether there’s a cleaner route.
Make sure the cast and crew are punctual, especially when working across different time zones. Ensure everyone knows the schedule and the time difference between both sites. Have a schedule and stick to it rigidly, we always say “we have a schedule, but we don’t have a plan.” Know who is needed for each session and how long that session is going to be. These can be long days, so make sure everyone’s time is used efficiently.
None of that sounds particularly revolutionary. Together, though, it can completely change how the space feels.
The technology creates the connection. The small adjustments create the shared room.

Make sure the room is reasonably quiet and not excessively echoey. Check that the screen is secure, on the floor, and at the same height as the partner screen. Make sure the remote performers appear at a believable scale, the camera and eye lines feel right, the microphones cover the playing area, and the sound seems to come from the direction of the screen.
Check the lighting, the network connection and the orientation of the two rooms. Point at things. Do the clap test in both directions. Walk around. Talk over one another. Run. Whisper. Make some noise. Work out where the limitations are. Then stop adjusting things simply because you can.
Bring the performers in. Let them play. And, if everything is working properly, allow the technology to gradually disappear into the rehearsal.
The aim, though, isn’t just for the technology to disappear. It’s for you to, as well, at least a little. As the project continues, gradually step back. Let the performers start to lead the space, suggest ideas for games, lead workshops themselves. By the midpoint of a project, the tutors should always be in the room, but rarely in shot, except when needed.
Above all, enjoy it.